Qbil-Trade relies on ‘Root Data’ as a foundational component to streamline business operations. This essential data enables the creation of contracts, invoices, transport documents, and other logistics-related documents, ensuring accuracy and organization. With Root Data, processes become faster, errors are minimized, and invoices are clearer. It’s the behind-the-scenes magic that helps businesses operate smoothly.
While Qbil-Trade users can manage this data manually, the Root Data Import Module offers a more efficient option for importing data in bulk. This module is available in the Root Data menu of Qbil-Trade.

There are several types of root data, including “payment conditions,” “incoterms,” “relations,” “products,” and others. Some of these work independently, while others have dependencies. For instance, “contacts,” “addresses,” and “VAT numbers” depend on the primary root data type, “relations.” In such cases, the main type must be imported into Qbil-Trade before importing the dependent types. This guide will explain the relationships between the different root data types.

Importing sequence #
Some root data screens require data input from other root data screens to establish links or set default values. Therefore, it is essential to follow the correct order when importing data into Qbil-Trade. This is because certain root data templates will depend on data you have previously imported or entered. For example, the “Relation Addresses” template includes a “Company Name” column, which will only display data if the “Relations” template has already been provided and imported into Qbil-Trade.
We advise you to follow the following order when importing root data:
- Product Groups
- Products
- Packaging Types
- Pallets
- Containers
- Payment Conditions
- Relations
- Relation Classification
- Relation Addresses
- Relation Contacts
- Relation VAT Numbers
- Relation Credit Limits
- Stand-alone loading/unloading locations without relation data
Filling a template #
When you are ready to fill out a template sheet with data, select a module from the drop-down menu. In the screenshot below, we have selected ‘Contact’. Once a module is selected, two new blue bars appear below the drop-down. The first bar (Step 1) allows you to download the template by clicking the Download Excel Template button. The second bar (Step 2) lets you upload the completed template by using the Upload File button.

After downloading the Excel template, open it and start entering the required data. Each column header indicates the type of data needed, with detailed information available in screen-specific knowledge base articles under the ‘Data Importing’ category. If you are uncertain about data requirements or formatting, refer to these articles for guidance. The screenshot below shows an example of the contacts template filled in with sample data.

Uploading and importing #
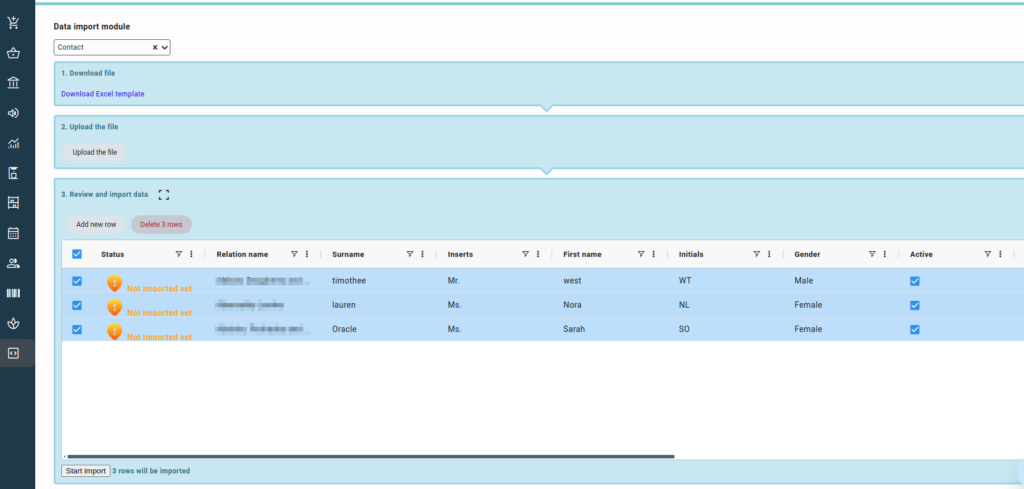
After filling out and saving your template, you’re ready to upload and import it into Qbil-Trade. To proceed, go to Step 2 and click the ‘Upload the file’ button. Once you’ve done this, a third blue frame will appear below Steps 1 and 2. This is the review section, where you can check your data before the final import.
In the review section, Qbil-Trade will automatically verify that all data is correctly provided and that all required fields are completed. If there are errors or missing data, these fields will be highlighted in red. Minor issues can be corrected by double-clicking the field and editing the data directly. For larger issues or entire columns of missing data, cancel the import, reopen the Excel file, make the necessary changes, and then attempt the import again.
Once all data is verified and ready for import, click the ‘Start import’ button.

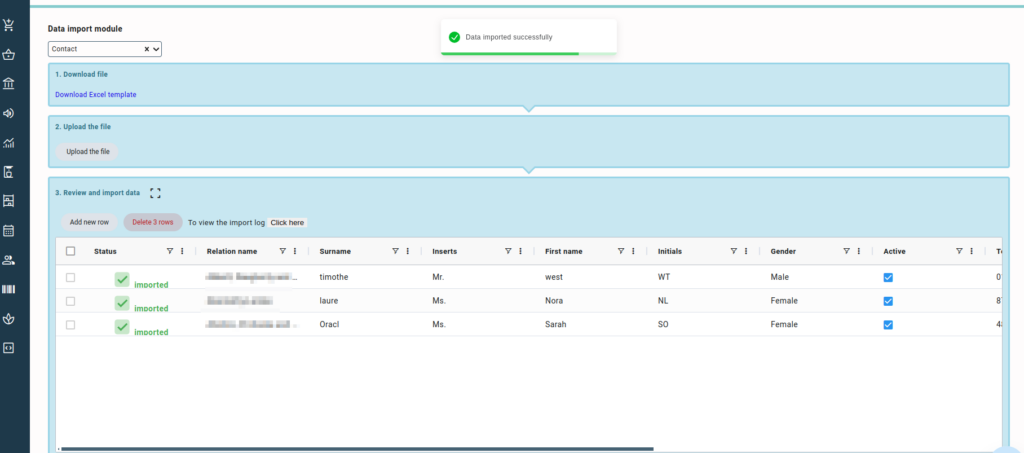
If everything went well, you will be promptly greeted with a ‘Data imported successfully’ notification at the top of the screen. And the records that have been successfully read into the database will now show as “imported” with a checkmark in the ‘Status’ column.

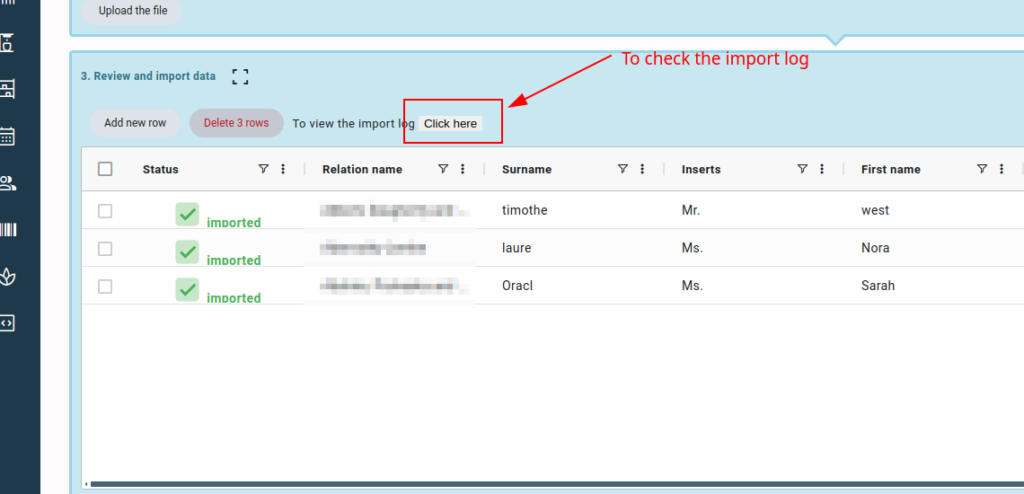
We recommend running a check after each import to confirm that the data has been imported successfully. To view the import log, click the ‘Click here’ button next to the text. However, for a more comprehensive overview, refer to the actual results of the import in Qbil-Trade.


