Attention: The new planning screen is currently a work in progress. Some features may be missing or not working as expected yet. We appreciate your patience as we work to improve the experience. Thank you!
General description #
The planning screen in Qbil-Trade allows you to keep track of and optimize all your orders by giving you a detailed overview of all orders. The planning screen also allows you to plan and schedule various activities related to orders or stock movements.
Creating invoices, orders, transport orders, and managing the statuses of various order documents are a few of the various activities that can be performed using the new planning screen. Additionally, it allows for the direct creation of orders for contracts with planned quantities.
The planning screen in Qbil-Trade offers various filters that allow you to filter and sort your planned orders based on different criteria, such as customer, product, order status, logistics employees, and loading/unloading dates, among others. You can even save your frequently used filter settings as filter profiles and apply them later without having to select the filters manually.
In addition to filtering, the planning screen also enables you to modify and customize the order details and columns as per your requirements using the “modify column” feature. You can also select the warnings or notifications on the “modify column” screen to be displayed for the orders, like logistic employees assigned or not. This allows you to view and track the specific information that is relevant to your business needs and make informed decisions based on that data.
Furthermore, the planning screen in Qbil-Trade offers two different viewing options, namely orderline view, and calendar view. The order line view provides a comprehensive and detailed overview of all the orders, their statuses, and associated details. Each type of order (line) is distinguished from other order (lines) by the different color codes for each type of order line, e.g. red for purchase order, green for sales order, etc. On the other hand, the calendar view offers a visual representation of all the orders periodically, enabling you to view and manage the orders weekly/daily based on their scheduled loading/unloading dates.
Overall, these features make the planning screen a powerful tool for managing and optimizing planned orders and provide you with greater control and flexibility in managing your orders and stock movements.
Planning screen overview #
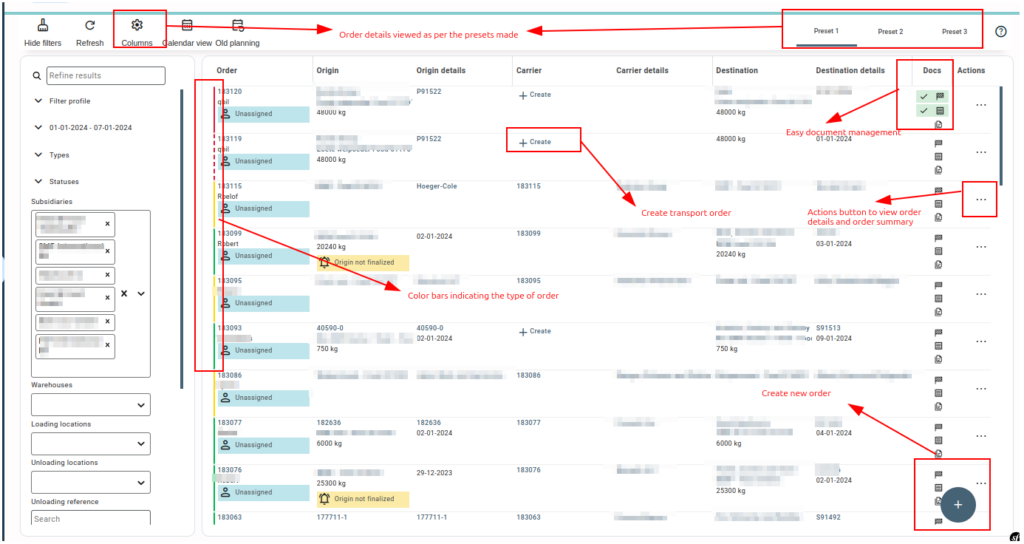
The planning screen consists of three main sections Filter menu, Presets, and Orders overview.

Filter menu #
The filter menu in the planning screen allows you to sort and filter orders in the screen as per your requirements from the available orders. The filter menu allows you to quickly narrow down the results in the order overview using the various filter options available like filter profiles, types, statuses, etc.

Filter profile #
You can create various filter profiles by applying the various preferences in the other filters and then saving these filter preferences. You can then quickly use these saved filter profiles later while using the planning screen. The filter profile feature can also help users set the same preferences for each time they use the planning screen, thus saving time. You (the user) can add a maximum of five filter profiles and also name them as per your preference. You can reset these filter profiles to default at any time.

Date filter #
On the planning screen’s order line view, you can use the date filter to narrow down the results. To do so, simply enter the “From” and “To” dates and the results will display all orders with loading, unloading, and order dates that fall within the selected dates. Additionally, you can use period shortcuts such as “today,” “yesterday,” “this week,” “this month,” “last month,” etc. to further refine your search.
By default, the date filter displays results based on loading, unloading, and order dates. However, you also have the option to filter results based on any one of these dates individually by selecting “loading date,” “unloading date,” or “order date.”

The selected period shortcuts and dates that are active are displayed with a check mark indicating the filters applied.

The selected/applied date filters can also be saved in the filter profiles as per the user’s requirement.
Types #
Using the types filter, you can filter the results in the planning screen as per the order type whether sales, purchase, etc. Orders without any order lines can be viewed as unknown orders.
The colour indicator for each order type helps in distinguishing between the various types of orders on the order line view.

Statuses #
Orders can also be filtered on the basis of their statuses. The various statuses of orders are finalized or non-finalized, invoiced or non-invoiced.

Subsidiaries #
You can also filter the order results in the planning screen as per the subsidiary(ies) of these orders.

Other Filters #
Many other filters are available in the filter menu, which you can use to display the results as per your requirements on the planning screen. These are loading locations, unloading locations, unloading references, employees, traders, relations, products, and carriers.

You can also use the generic search field to filter the orders. This generic search box refines the results based on any input provided, making it easier to find specific information quickly. This functionality allows you to search for any relevant data, like product name, supplier, or customer name, loading/unloading address, etc., not just order numbers, enhancing the overall efficiency and user experience of the planning screen.

Presets #
Presets or column presets allow you to select the data in your columns to be displayed (for orders) as per your requirements and specifications. The data in your columns varies as per the column. For example, for the column order, you can choose the order display number, order trader, order logistics employee, etc. Similarly for other columns, which are carrier and carrier details, you can select the details to be displayed using the modify columns.

Three presets are available by default, using which data in columns can be modified using the columns (modify) option. For multiple order types, different data in columns can be set in the order line section of each preset. For example, for the purchase order line type, you can select the data to be displayed in various columns like origin, origin details, etc. under the tab “purchase” in the order line section. Similarly for other order line types, you can select the data to be displayed in the respective tabs of the order line section.
Please note that you can add as many data fields as you want for each column, but it is preferred not to add more than three data fields for each column for a better user experience.
The origin and destination details column positions on the order line view can be swapped using the modify columns.
You can also show or hide some warnings displayed per order. The various warnings that can be displayed are:
- Origin not finalized: The warning indicates whether the origin is finalized or not. You can choose whether to display the warning per order line or not.
- Credit limit: The warning indicates if the relation’s credit limit is exceeded or not. The warning can be helpful to take the necessary action for such relations from the planning screen.
The warning is currently a work in progress and may not function as per the description. - Unassigned: If the logistic employee has not been assigned to an order, a warning can be displayed for the order. You can choose to show or hide this warning using the “Unassigned” checkbox.

Orders Overview #
This is the main section of your planning screen where the orders as per the selection made in filters and the preferences set in the preset are displayed. You can view the orders on the planning screens in two views: order line view and calendar view.
Orderline View #
The orderline view is the default view of the planning screen. This displays all the orders in the list view for the selected period (which by default is the current week). The listed view displays the orders and order lines in detail. The columns that display the order details can be modified using presets.

The origin, carrier, and destination details are displayed per order. Orders with multiple order lines have an arrow that is clickable to expand and display all the order lines associated with the order. The order with multiple orderlines shows the overall summarized details of all the orderlines in multiple columns.
The color indicators or bars against each order serve as a means of differentiating between the various order types, such as purchase, sale, back-to-back, etc. The color indicator for each order can be seen in the column “order,” which specifies the types of order; e.g., a red bar for an order signifies it is a purchase order. And if the color bar appears in dashes, it indicates that the order has an unknown origin or destination.
The orderline view also indicates whether all the orderlines per order are invoiced and finalized or not using the icons in the “Docs” column.

The gray-colored icons indicate all the orderlines of an orderline are not finalized or invoiced and when the orderlines are finalized and invoiced, these icons are displayed in green, respectively.
Functions performed on order line view #
The orderline view of the planning screen allows you to perform multiple operations in addition to getting an overview of the planned orders.
- You can quickly add transport orders to the orders that require such action.
- You can also create various invoices, such as goods invoices, sales invoices, etc., from the orderline view directly if the respective data field in the column is selected for the order type in the presets.

- Manage order documents and their statuses using the Docs button. The documents for buyers, suppliers, transporters, etc. can be managed using the docs section. Additionally, you can add additional documents per relation, relation address, product, and order as per your requirements.
- You can navigate to the various screens, like the carrier order, the product screen, the order screen, etc., associated with the order by clicking on the respective details of the order.
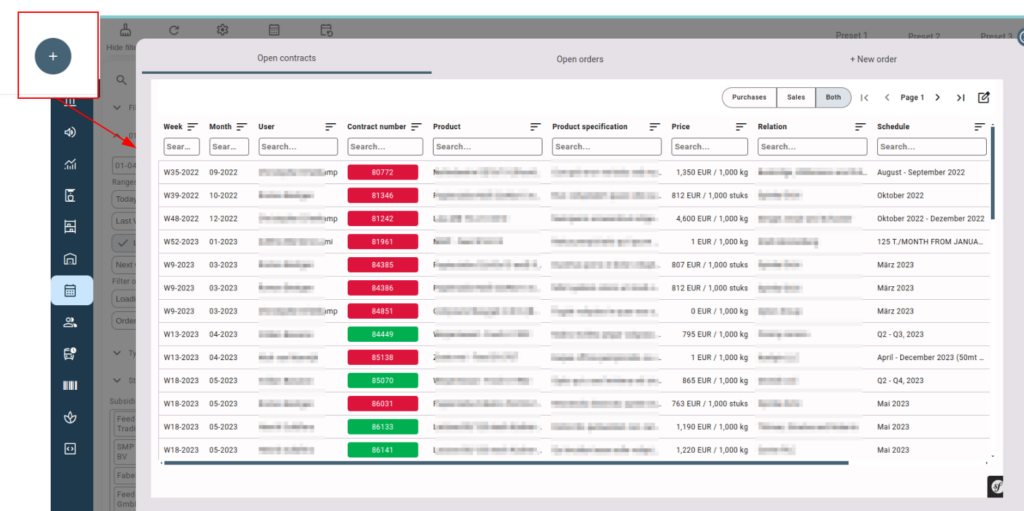
- New orders can also be created from the planning screen (only when you have required access to create orders).

-
- You can create orders for the contracts with planned quantities in “Open Contracts.”
- “Open Orders” displays all the orders with an order date of 00-00-0000 or order lines with an unknown destination or origin. You can add or edit the orderlines for such orders.
- You can also create new orders using “+New Order”.
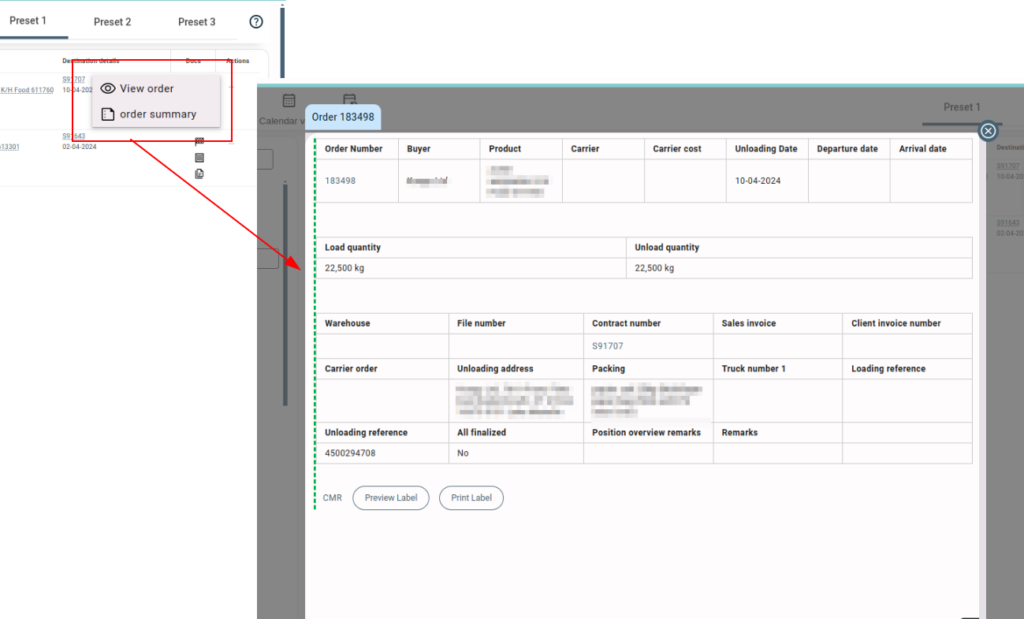
- You can also check the order summary and navigate to the order screen using the three-dot menu button in the actions column of the order. In the case of an order with multiple orderlines, the order summary shows the details of the first orderline in the order.

Calendar View #
You can easily switch to the calendar view from the list view using the calendar icon on the planning screen. The calendar view displays the orders as calendar items, where you can view the orders in weekly, daily, or list (month) mode. You can choose the mode that best suits your requirements and easily switch between them as needed.
The weekly view displays the planned orders for the days of the selected week in a vertical list format. You can easily navigate between different weeks and days using the navigation buttons.

The daily view displays the planned orders for the selected day in a list. You can navigate to orders and other order-related entities like relations, contracts, packaging, and invoices directly from the planning screen.

The list view displays all the orders per month, in which orders per day are displayed. This type of list view can be useful for quickly understanding the volume and frequency of orders per day.

Similar to the orderline view, the calendar view distinguishes each order type by a different color bar for each order; for example, a red bar for an order denotes that it is a purchase order.
The orders on the calendar view can be filtered using the common filtering options and presets for the planning screen.
The orders in the three sub-views of the calendar are displayed as per the below-given agenda:
- Purchase orders: The purchase orders are displayed as per the unloading date of the order.
- Sales orders: The sales orders are displayed as per the loading date of the order.
- Back-to-back orders: The back-to-back orders are displayed as per the loading date of the orders.
- Unknown orders: The unknown orders are displayed as per the loading date of the orders.
- Warehouse movement orders: The warehouse movement orders are displayed as per the loading date of the orders.
Note: The Document management in order line view and calendar view in the planning screen is still a work in progress and will soon be updated with many user-friendly features.


